AI-Powered Image Recognition in FileMaker (Part 2)
Welcome to Part 2! In Part 1, we covered how to set up and deploy an AI model for image recognition, laying the groundwork for powerful image-based search in FileMaker Pro 2025. Now that your AI model is set up and ready, it’s time to put it to work inside FileMaker Pro 2025. In this guide, you’ll learn how to:
- Follow best practices for generating and storing embeddings
- Build and configure scripts for semantic image search
- Generate and normalize embeddings for your images
- Structure your database for secure, efficient searching
- Understand how image size affects search results
- Troubleshoot common issues and ensure reliable result
- Responsible AI approach to vector embeddings
Best Practices for Using Embeddings in FileMaker
As this feature evolves, several best practices have emerged from real-world use and ongoing development. By adhering to these guidelines, you can prevent common errors and enhance the accuracy and reliability of your searches when integrating semantic image search into your FileMaker workflows.
- Always normalize your embeddings using
NormalizeEmbedding()before storing or comparing them. This keeps your results consistent. - Stick with the same AI model for both generating and querying embeddings. Mixing models will result in inaccurate results.
- Store your embedding vectors in container fields as binary data. It’s efficient and works across platforms.
- Use the “Continue on error” option in
Insert Embedding in Found Setto quickly spot any problematic records. - Limit access to embedding fields and script steps. Treat these as sensitive data, just like you would with passwords or confidential files.
Structuring Your FileMaker Pro Solution for Embeddings
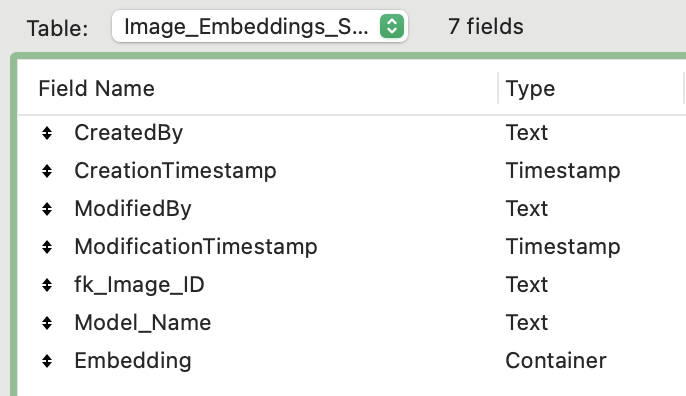
Field setup: modularized table used to store vector embeddings for images in container fields.
🛡️ Responsible AI Note: Store embeddings in encrypted container fields and apply field-level access control. Embeddings can contain latent patterns that reflect private or proprietary data, depending on which data you will be embedding.
Required Fields (Table Schema):
Image_Container(Container): Holds original image files.Image_Embedding_Vector(Container or Binary): Stores normalized vector output.
When setting this up, it is essential that you keep the schema simple and secure. You’ll thank yourself later for taking this step in clearly labeling your fields, and adding field comments.
Important Note:
If you are experimenting with different AI models, always keep track of which model generated each embedding. Either label your field names with the model name (e.g.,
Image_Embedding_Vector_CLIP_ViT_B_32) or use a modular system where the model name is stored in a dedicated field alongside each vector embedding. This makes it easy to identify which model was used for each embedding and prevents confusion or mismatches during search and analysis.
🛡️ Responsible AI Note: Always document which model is in use and ensure only authorized users can modify model settings. This helps maintain consistency and ensure accurate results in semantic search.
Which Model Again?
I covered this in Part 1 of FileMaker Image Search, but becuase choosing a model is so essential to the process, I’m adding here again as a reminder.
Currently, only one model is officially approved by Claris, but it works very well and is both safe and reliable.
I have also used these additional models successfully.
Generate Vector Embeddings
Before you can enable semantic image search in FileMaker Pro, you need to generate vector embeddings for your images. Embeddings are numerical representations that capture the unique visual features of each image, allowing the AI model to compare and find similar content efficiently. Creating embeddings is what the AI model (that you selected in Part 1) does. After you have selected the image field in your database that you want to be able to search on, you will write a script to point to this field, and the AI model will generate the embeddings for you, voila!
Initial Embedding Process
Purpose: Populate the embedding field for all existing images in the selected image field in your database.
Script Steps:
How:
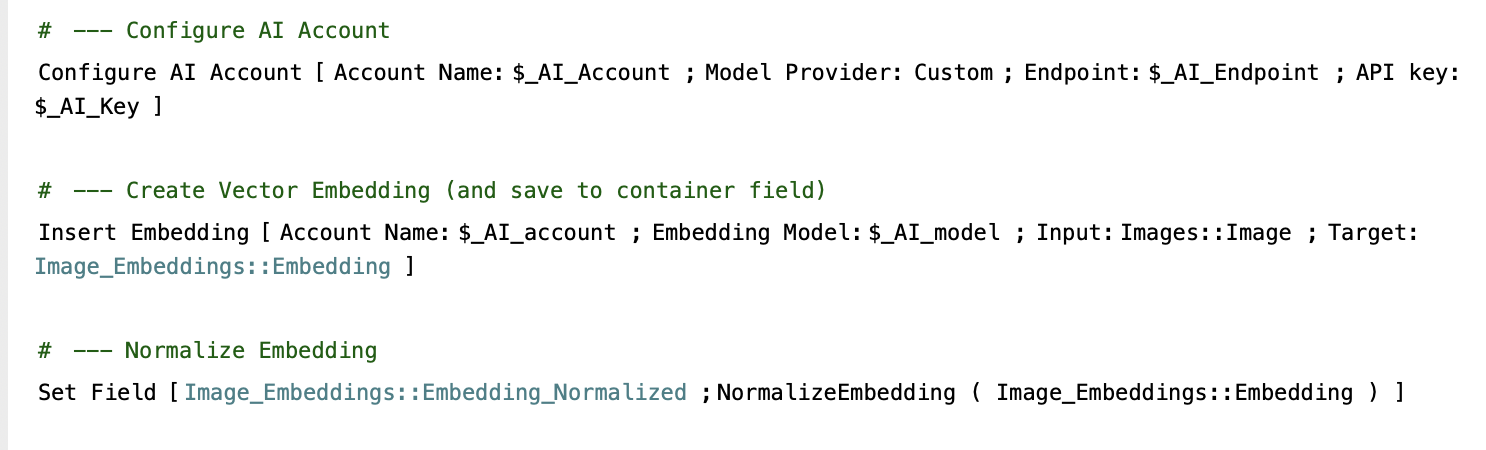
- Initialize your model using the
Configure AI Accountscript step, using the AI model you have selected to work with. - Run the
Insert Embedding in Found Setscript or use a loop with theInsert Embeddingscript step. - Source Field: Your image container field (e.g.,
Image_Container). - Target Field: Your embedding vector field (e.g.,
Image_Embedding_Vector). - Use the correct AI model you named in the Configure AI Account step (e.g.,
clip-ViT-B-32). - If using the
Insert Embedding in Found SetEnable “Continue on error” to catch any problematic records. This is a new feature as of FileMaker 22. - Use the
NormalizeEmbeddingfunction to normalize embeddings before storing. - Set Field [ Image_Embedding_Vector ; NormalizeEmbedding ( Image_Embedding_Vector ) ]
Ongoing Embedding for New Images
Purpose: Ensure every new image added to the system gets an embedding generated automatically.
Script Steps: Same as used for Initial Embedding Process
How:
- Set up a script trigger or part of a scripted process to run when new images are added to your system.
- The script should:
- Check if the embedding field is empty or needs updating.
- Generate and normalize the embedding for the new image.
- Store the embedding in the appropriate field.
- Optionally, log the model and timestamp for traceability.
🛡️ Responsible AI Note: Normalize all vectors and document which model generated them. This ensures consistency and avoids introducing bias through model mixing. If your embedding is already normalized, running the NormalizeEmbedding function won’t do anything, so there’s no harm in running it on an already normalized embedding.
Perform Semantic Find by Image
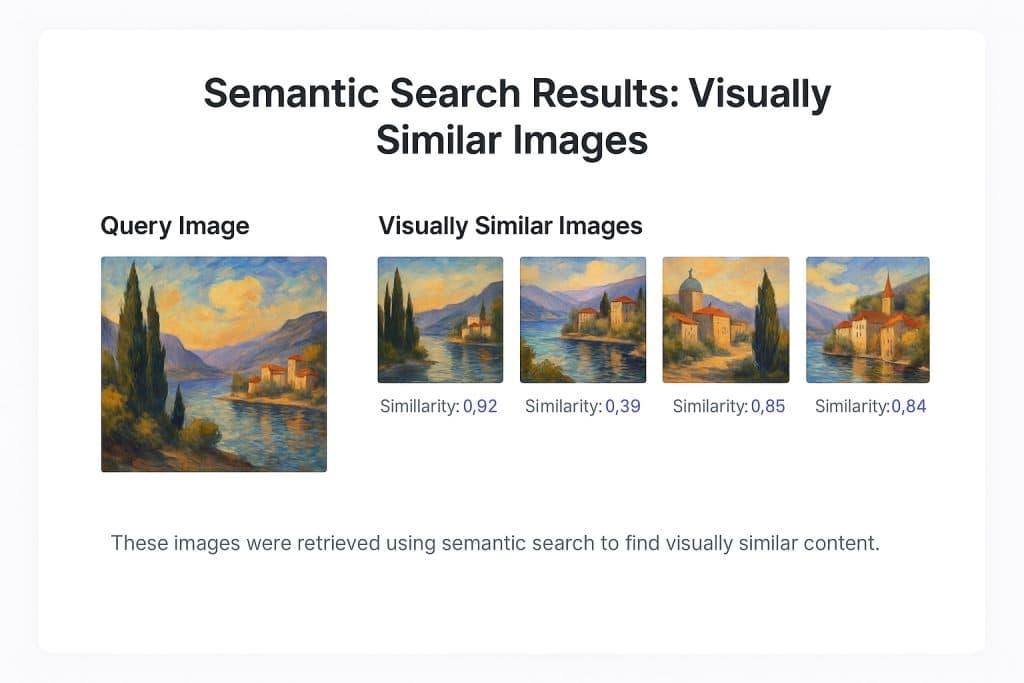
The goal here is to give someone the ability to drag and drop or insert an image into a query field, then have the database find all similar images. To do this, you will use the Perform Semantic Find script step. This script step is compatible with FileMaker 21, but with the FileMaker 22 release, a new option became available.
This option allows you to have the search field be an image, so we can do exactly what we plan – drag and drop an image, then find the closest matches below. You have control over several options in the Perform Semantic Find script step, using cosine similarity to limit the found set based on the closest matches. Remember, cosine similarity is measured from 0 to 1, with 1 being a perfect match.

Example configuration:
Perform Semantic Find
- Query By: Image
- Image Source: $$queryImage
- Custom Endpoint: clip-ViT-B-32
- Result: Found Set of semantically similar records
🛡️ Responsible AI Tip: If you want your users to trust the results, be transparent about what “similar” means. Avoid misleading users with vague search language. Clearly indicate that results are semantically similar, not exact matches. If users can adjust thresholds, provide guidance or warnings.
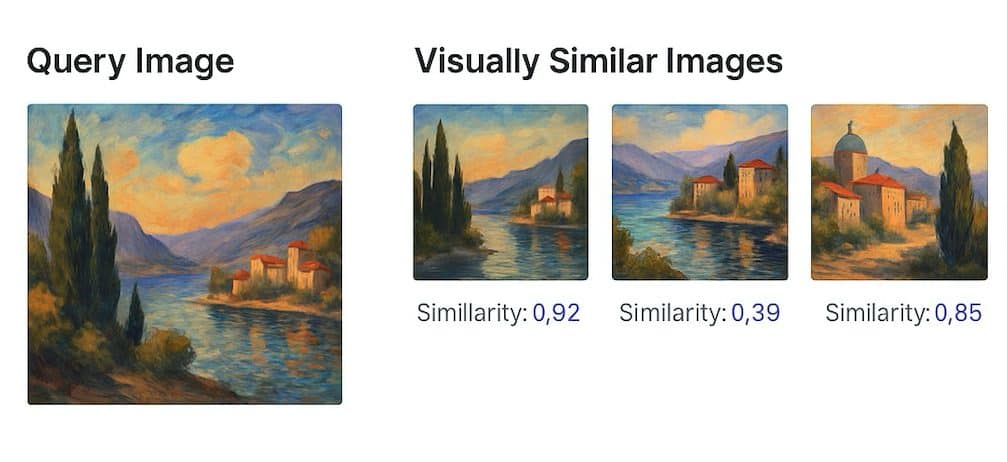
Embedding Consistency: Why Image Size Matters
When implementing AI-powered image search in FileMaker Pro, I found image resolution plays a crucial role in the quality and consistency of the embedding vectors. Higher-resolution images retain more visual detail after resizing, which typically leads to more accurate and reliable embeddings. Consistency in image sizing is key for dependable search results.
How to Test Embeddings with Different Image Sizes
To understand the impact of image size on embeddings, you can run a simple experiment:
- Select an Image: Choose a single image you want to test.
- Create Variants: Prepare two versions of the image—one at full resolution and one as a thumbnail (smaller size).
- Generate Embeddings: Use the same AI model (e.g., CLIP-ViT-B-32) to generate embeddings for both images in FileMaker Pro.
- Compare Embeddings: Examine the resulting embedding vectors. Even though the images are visually identical to the human eye, the vectors may differ slightly due to the change in resolution.
- Test Search Results: Try running semantic searches using both embeddings as queries. Observe if the search results are consistent or if the difference in image size leads to different matches.
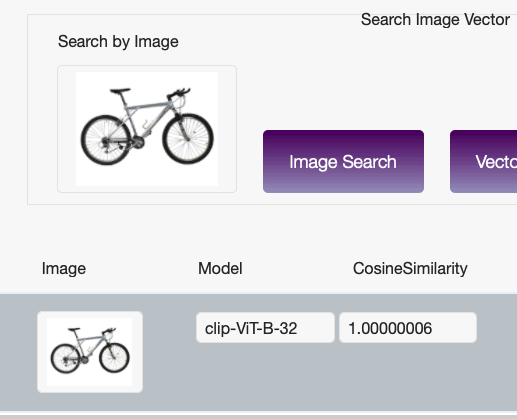
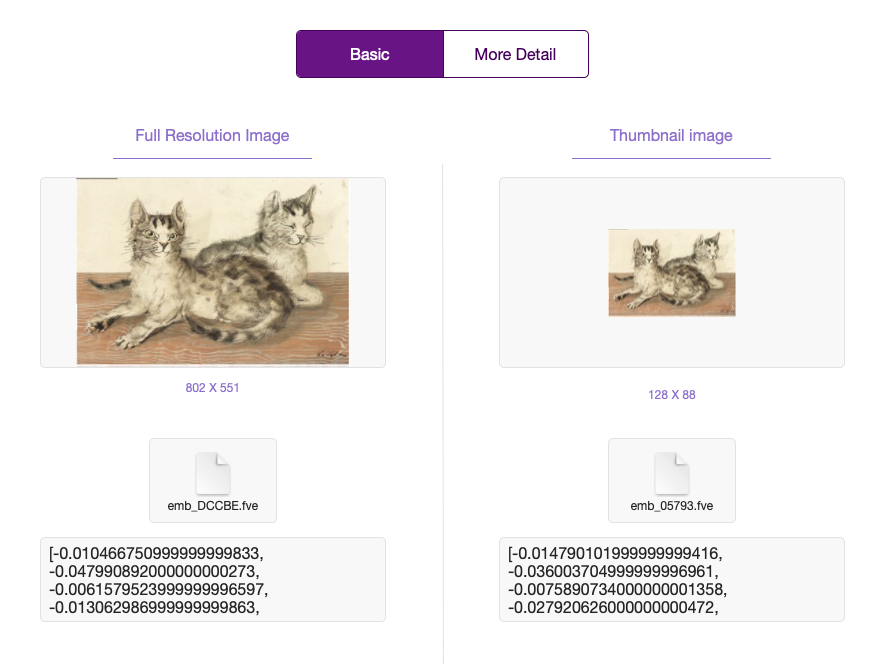
Example of Different Image Sizes Yielding Different Embeddings
In the images below, you can see the exact same photo where one is at full size, and one as a thumbnail. When I used CLIP-ViT-B-32 to create embeddings, the vectors were slightly different. Sometimes, this difference is negligible, but in other cases, it can affect the accuracy of your search results.
🛡️ Responsible AI Tip: There isn’t a single “best” approach for every use case, but maintaining consistent image resolutions across your dataset is highly recommended. This helps ensure that your embeddings are as comparable as possible, leading to more accurate and trustworthy search results.
Comparison of semantic search results in FileMaker Pro using different image resolutions.
Why It Matters
- Resizing Changes Content: Resizing alters the visual details the model processes.
- High vs. Low Resolution: High-res images retain more semantic detail after resizing, while low-res images may lose key features.
- Embedding Variance: Different resolutions produce distinct embeddings, leading to inconsistent results.
- Semantic Drift: Smaller images may lose critical elements, altering the model’s interpretation.
Best Practices for Consistency
Consistency is key.
- Use consistent image resolution for indexing and querying.
- Prioritize high-quality images to preserve semantic detail.
- Document image sizes and ensure team-wide adherence to standards.
- Automate resizing to standardize inputs if working with mixed resolutions.
🛡️ Responsible AI Note: Embedding models are sensitive to image resolution. Different sizes of the same image, such as a full-resolution photo versus a thumbnail, can produce varying embedding vectors despite appearing identical to humans.
Searching by Image vs. Searching by Vector
Understanding Semantic Search Modes
Currently there are two way to search for image embeddings in FileMaker.
FileMaker Pro 2025 released the new option “Search by Image”. FileMaker 2024 had the option to “Search by Vector” lets you search by meaning (just drop in an image) or by vector (which requires an embedding as an input). Here’s what you need to know:
| Method | Description | Benefit | Limitation |
| Search by Image | You pass an image directly to the Perform Semantic Find script step | Fast, easy, user-friendly | Cosine similarity scores are not exposed |
| Search by Vector | You generate a vector for the query image first using Insert Embedding, then use that for search | Enables similarity score inspection | Slightly more setup required, need additional field or variable to display cosine similarity. |
Why Search by Vector Can Improve Explainability
- Cosine similarity can be extracted or logged when the query is already an embedding.
- This allows you and your team to see a score that reflects how close the match was. This is helpful for trust and transparency.
- It is also great for debugging or ranking results with more control.
🛡️ Responsible AI Note: To enhance explainability, consider using vector-based search instead of direct image search. This allows you to display cosine similarity scores alongside results, giving users a clear understanding of how closely matched the results are to their query. Providing this transparency builds trust and helps users interpret the AI’s decision-making process.
How to Use AI Logging
I find logs to be essential when working with AI. Based on the black-box non-deterministic nature of the models, we need a way to view (as best we can) what is happening behind the scenes. This also helps with explainability, a central principle of responsible AI.
When using image embeddings, FileMaker provides two powerful ways to capture logs, which are essential for building a robust and responsible AI system. Logging provides a complete “trace” of all actions, messages, tool calls, and data retrievals, from the initial user query to the final response.
Server-Side Logging
If you are running the FileMaker AI server to host your embedding model (see AI-Powered Image Recognition in FileMaker Part 1 ), you will see the AI Logs in the Logs folder on your server. There are two primary log files: fm_LLMOS_Debug.txt and fm_LLMOS_Debug.log
- Logs are found in OS-specific directories
- Windows:
C:\ProgramData\FileMaker\Open_Source_LLM\server\ - Ubuntu:
/opt/FileMaker/Open_Source_LLM/server/ - macOS:
/Library/FileMakerLLM/Open_Source_LLM/server/
- Windows:
Client-Side & Application Logging
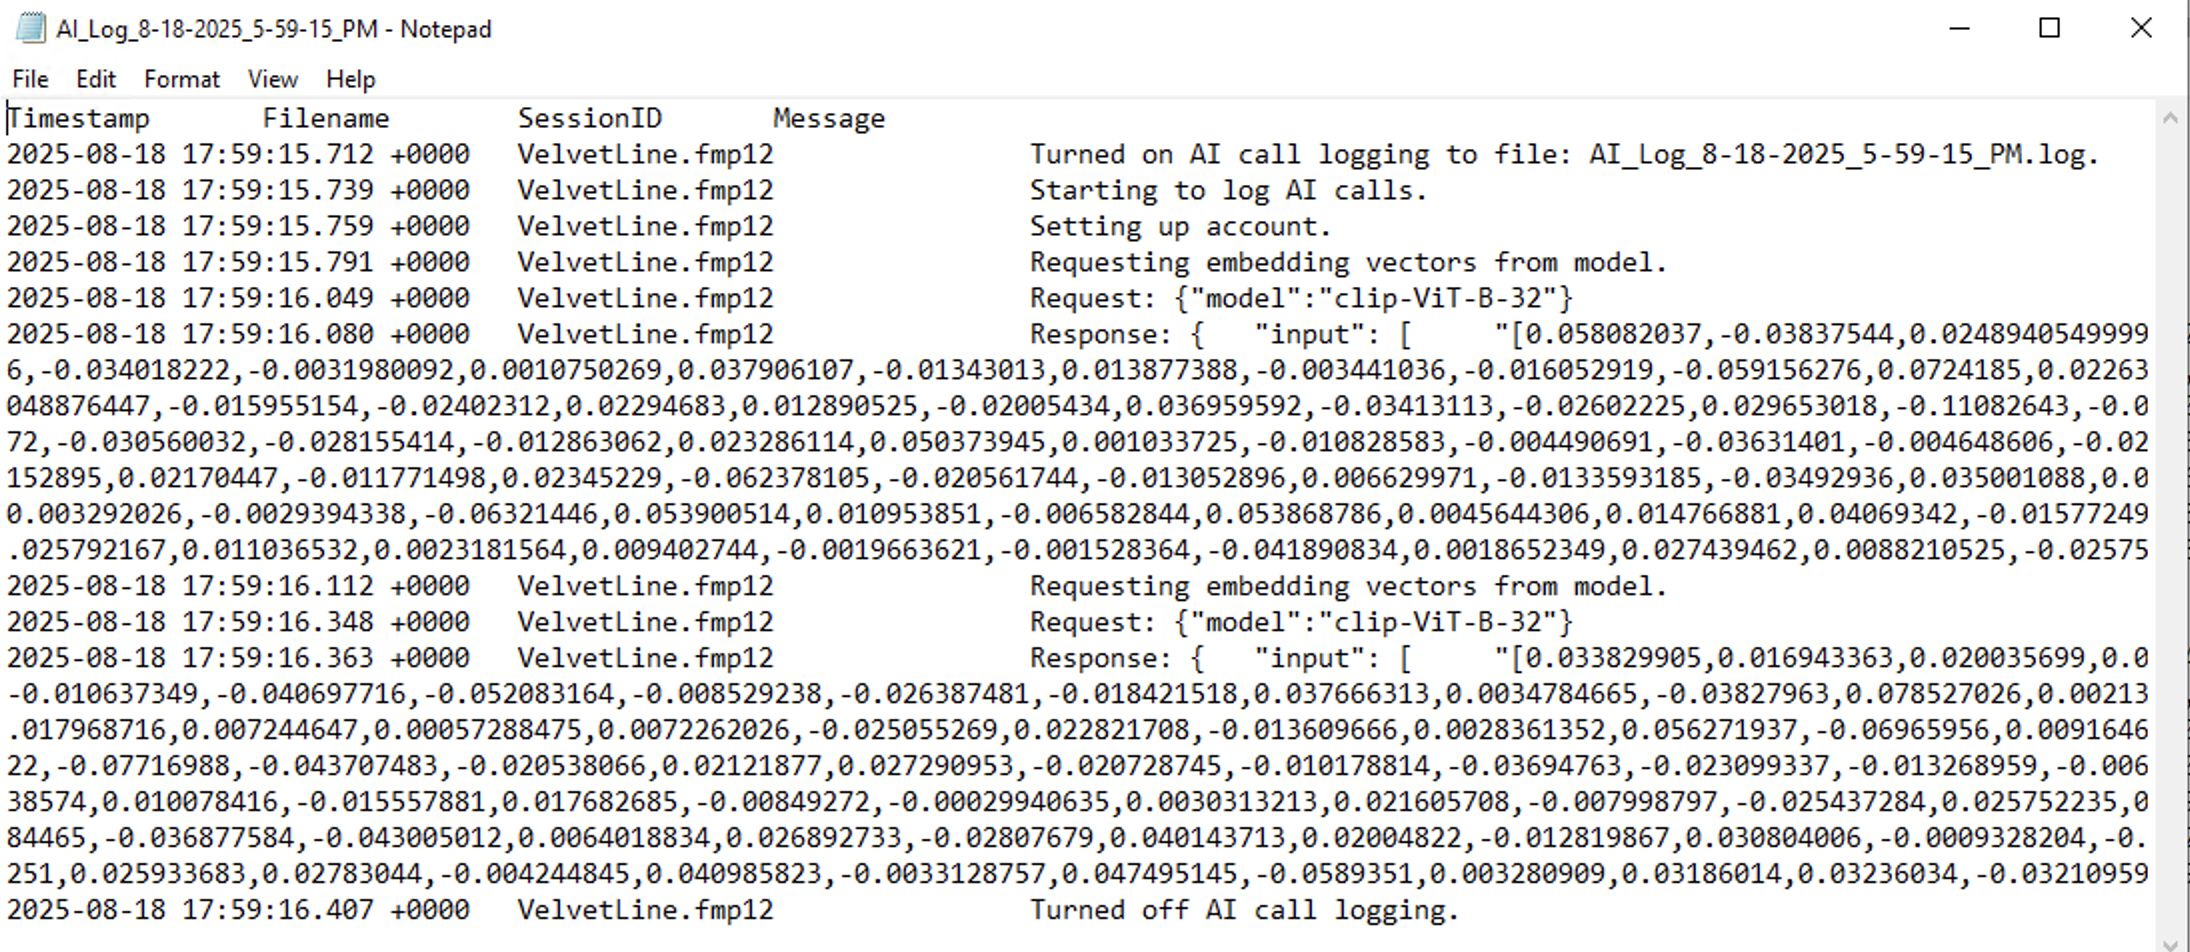
AI Log for Client Side
Using the client-side logging is very useful for debugging. By using teh Set AI Call Logging script step, you can view extra details about the AI call.
- Capture model’s intermediate decisions by storing tool call details in a field or variable
- Use “Agentic mode: Off” to stop after the first tool call, allowing manual review of tool interactions
- Log message history (user question and assistant answer) to maintain context across sessions and facilitate debugging
AI Logging Best Practices
It’s essential to have verbose logging enabled while actively debugging, as it provides more detailed information. However, in production, it’s advisable to turn verbose logging off.
- Manage log deletion through the Data File script steps in FileMaker.
- Use the Read File step to extract contents from the log before deletion.
- Use the Delete File step to remove the log after reading and importing the necessary information.
- Leverage the Session Identifier to add additional information and track separate processes for better log understanding.
- Turn off verbose logging when generating or processing embeddings to prevent sensitive vector data from being included in the logs.
🛡️ Responsible AI Note: Use logging to enhance transparency and accountability in your AI workflows, but avoid capturing sensitive data in logs. Enable verbose logging only for debugging, and turn it off in production to protect privacy and maintain performance. Regularly review and manage logs to meet compliance and governance needs.
Final Thoughts for Now
You have now seen how to embed open-source AI models directly into your FileMaker Server, generate and normalize vector embeddings, and enable intuitive image-based search in your solutions. The best part is that you are in control. Your data stays private and your users get a whole new way to search images in their FileMaker solution.
Helpful Links
- FileMaker Server Help
- Configuring AI Services in FileMaker Server
- FileMaker Pro Release Notes
- FileMaker Server Operating System Requirements
- Embedding Function Documentation
- Running Your Own AI Server
FAQ
What happens if I don’t use the same model to generate and find embeddings in FileMaker?
Results will likely be inaccurate or unpredictable. Embeddings generated by different models, even if they serve similar purposes, occupy different vector spaces. Always use the same exact model (same name and version) for both indexing and querying.
What are the supported models to search images in FileMaker?
FileMaker 2025 supports CLIP-based models, including:
clip-ViT-B-32clip-ViT-B-32-multilingual-v1
More models may be added by hosting them yourself via Hugging Face integration. Check the Admin Console to download and manage available models.
How much does image search in FileMaker cost?
There are no additional licensing costs for using local models with FileMaker 2025 if you’re on a supported FileMaker Server deployment. However, you’ll need adequate server resources (CPU/GPU), and possibly storage for model downloads. Consider the operational cost of embedding large datasets and running queries at scale.
How do I get started searching for images in FileMaker?
- Ensure FileMaker Server has AI model support enabled and a model loaded.
- Add fields to your FileMaker table for image storage and embedding vectors.
- Use
Insert Embedding in Found Setwith a custom endpoint to vectorize your images. - Use
Perform Semantic Find [Query by: Image]to retrieve similar images. - Optionally, embed the query image first and use vector-based search to retrieve cosine similarity scores.